Dongguan city, kingda plastic insulation board co., LTD
Contact: manager zhao
Mobile phone: 13509011897
Telephone:
Fax:
Email:1440816890@qq.com
Website:www.qdjnkj.com
Address: Zhongtang town Zhancui Nan di Industrial area
Construction preparation
1. Material preparation
1.1 acceptance, storage and transportation of materials shall comply with the relevant requirements and shall be classified and stored. The extruded sheet is laid flat into a bag; Polymer mortar and special binder storage to pay attention to rain and moisture;Wire mesh, fixed parts should also be stored against rain.
1.2 in the process of transportation and storage, moisture and rain should be avoided.
2. Construction tools
Electric wire cutter, electric stirrer, wallpaper knife, electric screwdriver, scissors, hacksaw blade, ink bucket, brown brush or roller, coarse sandpaper, plastic mixing bucket, impact drill, electric hammer, float, press, zizi of Yin Yang Angle, support wire plate, 2m by ruler, etc
The construction technology
1. Process flow
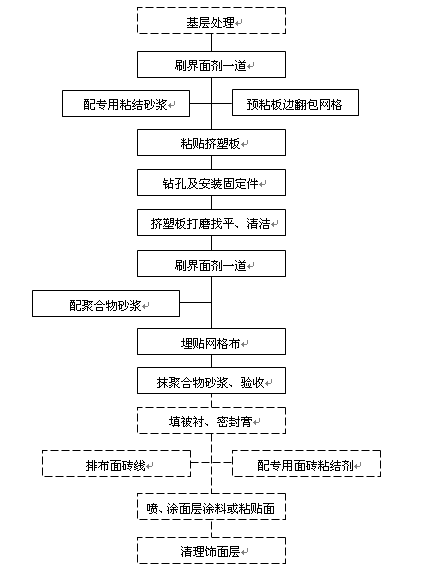
2.1 basic treatment 2.4 preparation of special binder
2. Construction technology
2.1 grassroots treatment
2.1.1 remove the materials that affect the bond strength, such as floating ash, paint, oil, air drum and weathering materials, etc. of the accepted and qualified base wall.
2.1.2 for the outer wall of the project, the maximum deviation should be less than 4mm, and the out-of-tolerance part should be cut or repaired with 1:3 cement mortar.
2.1.3 in order to increase the bonding force between the extruded plate and the base, the surface of the extruded plate shall be coated with interfacial agent, and then polymer mortar shall be used as binder or protective layer.
2.2 missile control line
According to the building facade design and external insulation technical requirements, on the basic level of the horizontal line, vertical control line, etc.
2.3 hang the reference line
2.3.1 hang out the vertical reference control line and eject the horizontal control baseline at the big corner of the outer wall of the building (negative Angle, positive Angle) and other necessary places.
2.3.2 in the construction process, each floor should be properly hung with horizontal lines to control the verticality and flatness of the extruded board.
2.4 prepare special binder
2.4.1 pour five parts of dry mixed mortar into a clean plastic mixing bucket, add about one part of water, pay attention to mixing while adding water, and then stir with a hand-held electric mixer for about five minutes, until the mixing is uniform and the consistency is moderate. Ensure that the polymer mortar has a certain viscosity.
2.4.2 after the above work is completed, the mixed mortar should be left standing for 5 minutes and then mixed for use. The adjusted mortar should be finished within an hour.
2.5. Paste the turn-over mesh cloth
2.5.1 where the side of the extruded sheet is exposed and the door and window openings are exposed, the mesh cloth shall be turned over.
2.6 paste the extruded sheet
2.6.1 the standard extruded outer wall plate size is 1200×600mm. Non-standard size and local irregularities can be cut by electric wire cutter or tool knife on site, the size tolerance is allowed to ±1.5mm, the size of the vertical surface. The edge of whole metope corner place applies the minimum size to exceed 300 mm extruded model board.
2.6.2 scrape a special interface agent with a thin layer on the surface of the extruded plate (single side), and then apply the special adhesive after it is cooled and dried.
2.6.3 paste the extruded board with the strip point method: use the trowel to smear 50mm wide around the surface of each extruded board that has been coated with the interface agent, gradually thicken the special polymer mortar from the edge to the middle, the thickest part is 10 mm, and then spread nine plum blossom spots on the extruded board, the spacing between the plum blossom spots is even, to ensure that the bonding area of the extruded board is ≥ 30 .
2.6.4 after applying the ash, immediately attach the extruded sheet to the wall, and use 2M ruler to squeeze and level it to ensure that its vertical, flatness and bonding area meet the requirements. The meeting place must not wipe bonding mortar, each paste a piece, should be promptly cleared out of the mortar. Between the board to squeeze between the board, do not have a joint, the joint is more than 1.5mm with the extrusion plate filler. The height difference should not be greater than 1.5mm, otherwise, use the sander to grind flat.
2.6.5 during construction, the extruded plastic plates shall be pasted horizontally, and the upper and lower extruded plastic plates shall stagger each other vertically by 1/2 plate length, so as to ensure the minimum staggered joint size is not less than 200mm.
2.6.6 in the wall corner, should first arrange the size, cut the extrusion board, so that when it is pasted vertically staggered connection, to ensure that the corner straight and vertical.
2.6.7 when pasting the positive Angle around the window frame and the positive Angle outside the wall, the reference line should pop out first as the basis for controlling the vertical rise and fall of the positive Angle.
2.7 install fixed parts
2.7.1 the extruded plate shall be firmly pasted, and the fixed parts shall be installed within 24 hours. The drill hole shall be drilled with a percussion drill according to the design requirements. The anchorage depth shall be 50mm and the drilling depth shall be 60mm.
2.7.2 number of fixed parts in position:
From 5 to 17 floors (including 17 floors), there are about 6 floors per square meter;
Any single plate with an area of more than 0.1 square meters must be fixed, depending on the shape and site conditions.
2.7.3 encryption of fixed parts: the Yang Angle, under the cornice and around the door and window openings should be encrypted, not less than 60mm from the edge of the base, and not more than 300mm from the distance.
2.7.4 self-tapping screws shall be tightened and the cap of the engineering plastic expansion nail shall be flush with the surface of the extruded plate or slightly screwed in to ensure that the tail of the expansion nail shall be fully anchored with the base.
2.9. Grind and level
2.9.1 after the completion of the construction of the fixed parts, rough sandpaper shall be applied to the uneven joints of the extrusion board. The polishing action should be gentle circular movement, not along the direction equal to the joints of the extrusion board.
2.9.2 after polishing, apply the brush to clean the debris and other floating ashes generated by the polishing operation
2.9.3 paste the unevenness of the extruded board and apply the surface layer polymer mortar to level it. Brush the interfacial agent before leveling.
2.10 apply the bottom layer of polymer mortar
Apply a thin layer of interfacial agent on the surface of the extruded sheet. After being cooled and dried, apply the polymer mortar evenly on the extruded sheet with a thickness of about 2mm.
2.11. Press into the grid
2.11.1. Immediately press the polymer mortar into the grid cloth.
2.11.2 the mesh cloth shall be cut according to the length of the working face and the lap length shall be set aside.
2.11.3 add a layer of 300 mm × 200 mm grid cloth to strengthen the 45 ℃ external corner formed by the inner periphery of the door and window opening and the large wall, and the large grid cloth is overlapped on the grid cloth around the door and window opening.
2.11.4 mesh cloth and bonding mortar shall be used to cover the end of the extruded plate around the window, doorway and other openings. Only at this time can the bonding mortar be applied to the edge of the extruded plate.
2.11.5 stretch and flatten the large grid cloth along the horizontal direction, and turn the curved side inward. Wipe the grid cloth flat with a trowel from the middle up and on the bottom sides to make it close to the bottom polymer mortar. The left and right overlap width of the grid cloth shall not be less than 100mm, and the upper and lower overlap width shall not be less than 80mm. Polymer mortar can be used to supplement the insufficiency of the original polymer mortar in the local overlap, and the mesh cloth shall not be folded, empty and warped.
2.11.6 at the Angle of Yin and Yang, the Angle shall be bidirectional wound from each side and the overlap width shall not be less than 200mm.
2.12. Plastered polymer mortar
After finishing the bottom layer of polymer mortar, press it into the grid cloth and wait for the mortar to dry to non-stick to the hand, the plastering layer of polymer mortar, plastering thickness to cover the grid cloth, about 1mm. Make the total thickness of mortar protective layer about 2.5±mm0.5.
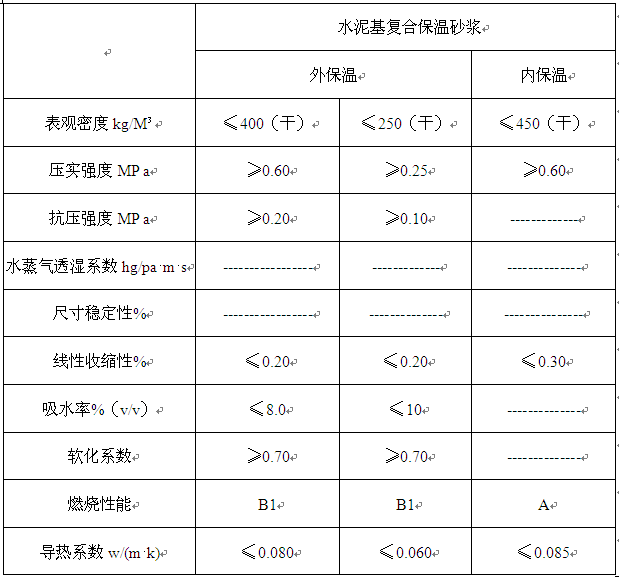
Construction of insulating mortar
Main performance index of insulation mortar
1. Process flow
1.1 base course treatment → square setting, making ash cake according to rules → plastering 15 thick insulation mortar → electric hammer drilling → laying steel wire mesh → plastering 8mm thick anti crack mortar → acceptance, watering and maintenance
1.2 base course treatment: the same as that of extruded insulation board.
1.3 set the square and make the ash cake according to the rules: the method of ash cake is the same as that of extruded insulation board outer wall. The thickness of ash cake is 15mm. Before plastering the insulation mortar, 1:3 cement mortar is used as the corner protection, and then plastering the insulation mortar.
1.4 plastering insulation mortar
1.4.1 when mixing the stone forest thermal insulation mortar composite material, the ash water weight ratio shall be determined according to the ambient temperature and the dry humidity of the base course. Generally, the powder water ratio is: Powder: water = 1:0.65, the consistency should be controlled within 60-80mm, and it should be used when mixing, and it should be used up within 4 hours generally;
1.4.2 after the construction thickness is determined, the thermal insulation mortar composite material shall be applied layer by layer, and the thickness of each layer shall not be greater than 12mm.
1.4.3 when applying the thermal insulation layer, the first layer of thermal insulation mortar shall be applied from bottom to top (Note: the operator shall use wrist force). After the material reaches the final setting (about 24 hours), the second layer of thermal insulation mortar can be applied (according to the first plastering method). When the insulation mortar for the second time reaches seven layers of dryness, after the trowel is used to compact and roughen, the surface shall be scraped with the carrying ruler according to the standard block, and the uneven part shall be filled with the insulation mortar until it is straight, then the surface can be trowelled;
1.4.4 the insulation layer shall be watered after final setting. Keep the surface free from whitening, and the watering and curing time shall not be less than 7 hours.
1.5 laying and installation of steel wire mesh and supporting insulation nails
Main performance indexes of enhanced network

When the insulation layer reaches final setting (about 3-4 days), holes shall be punched with electric hammer at a certain interval (4 holes / m2, the depth of holes shall be greater than the length of insulation nails by about 10 mm); steel wire mesh shall be laid on the insulation layer (Note: the bending face of the steel wire mesh shall be inward, and the joints shall be overlapped by about 50 mm-80 mm); then expansion nails shall be installed and fixed with the steel wire mesh according to the original hole distance.
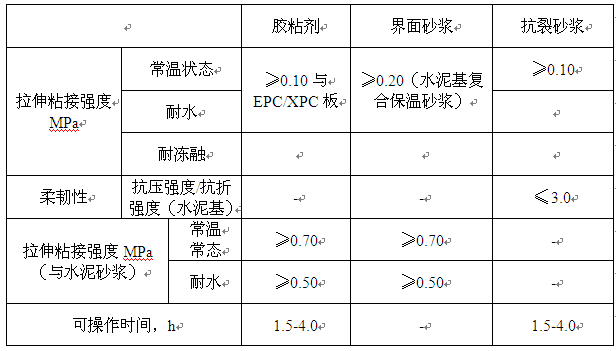
1.6 anti crack mortar construction
Main performance indexes of adhesive, interface mortar and anti crack mortar
1.6.1 construction preparation of anti crack mortar surface course: the plastering of anti crack mortar surface course must be carried out 5 days after the insulation layer is fully set, and watered one day before construction. One hour before plastering, water shall be poured again.
1.6.2 the anti crack mortar shall be mixed and used at any time, and the storage time shall not exceed 2 hours, and the floor ash shall not be recycled; the anti crack mortar preparation: anti crack and anti permeability agent: medium sand: water = 1:3:0.75 (weight ratio), and the consistency shall be controlled within 60mm-90mm.
1.6.3 the design requirement for the thickness of anti-seepage and anti crack surface layer is about 8mm (Note: determined according to the flatness of the insulation layer)
1.7 acceptance, watering and maintenance
The anti crack mortar surface course shall be cured according to the temperature of the environment season. After the initial setting of the material, it shall be watered and cured for at least 7 hours, and the interval between watering and curing shall be at least 7 hours;
5、 Quality inspection methods and key points
1. Guarantee project
1.1 the specifications and technical indexes of extruded board, composite thermal insulation mortar and grid cloth, the preparation of polymer mortar and the quality of raw materials must meet the requirements of this specification and relevant standards. Inspection method: check the factory certificate or carry out re inspection.
1.2. Polymer mortar and extruded board must be tightly bonded without delamination. Inspection method: observation and push-pull inspection by hand.Observation and inspection. Inspection quantity: spot check two places every three floors.
1.3. Polymer mortar and extruded board, thermal insulation mortar and base must be bonded closely without delamination and hollowing. The surface layer shall be free of blast ash and cracks.
Inspection method: tap with a small hammer and observe
Inspection quantity: spot check two places every three floors.
1.4. Sampling and re inspection of the pull-out strength of anchor bolts. If there are requirements in the design, the quantity shall be tested according to the design requirements. If there are no requirements in the design, the quantity shall not be less than 1 ‰ and not less than 3 (for thin plastering external wall insulation system, the number of tests shall not be less than 1 group for each building).
1.5. Detection of the bonding strength of external wall tiles. For the external wall facing brick works inlaid on site, a group of samples shall be taken for every 500m2 of the same type of wall, three for each group, and no less than one group shall be taken for every two floors; a group of samples shall be taken for the same type of wall less than 500m2.
2. Basic items
The total bonding area between each extrusion board and the base course surface is about ≥ 30%.
Inspection method: measure with ruler and take the average value.
Inspection quantity: one spot check shall be conducted for every two floors of each floor, and each inspection shall not be less than 2 pieces.
Note: the inspection shall be carried out before the binder is set.
The expansion plug part of engineering plastic fixed parts entering into the structural wall shall not be less than 50mm.
Inspection method: withdraw the self tapping screw and observe.
Inspection quantity: one spot check shall be conducted for every two floors of each floor, and each inspection shall not be less than 2 pieces.
No adhesive is applied to the head joint of Extrusion board.
Inspection method: observation and inspection.
Inspection quantity: one spot check shall be conducted for every two floors of each floor, and each inspection shall not be less than 2 pieces.
The grid cloth shall be laid crosswise and pressed tightly without wrinkles, warping, exposure, etc. the lap width shall not be less than 100mm around and 80mm up and down.
Inspection method: observation and ruler measurement.
Inspection quantity: one spot check shall be conducted for each third floor of each floor, and each inspection shall not be less than 2 pieces.
Before plastering the special adhesive and polymer mortar, check whether the interface agent has been brushed (sprayed).
Inspection method: observe and touch to check whether there is sticky feeling.
Inspection quantity: spot check one place per two floors, but no less than 8 places.
3. Allowable deviation items
The allowable deviation of extrusion plate installation shall meet the requirements of the following table.
Allowable deviation and inspection method of Extrusion board installation
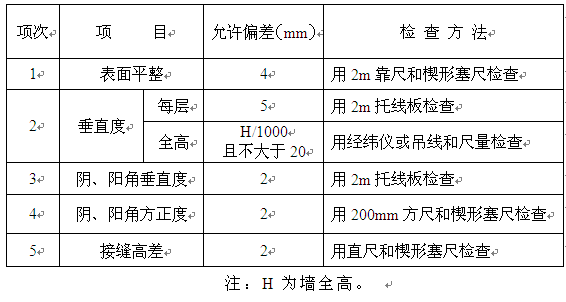
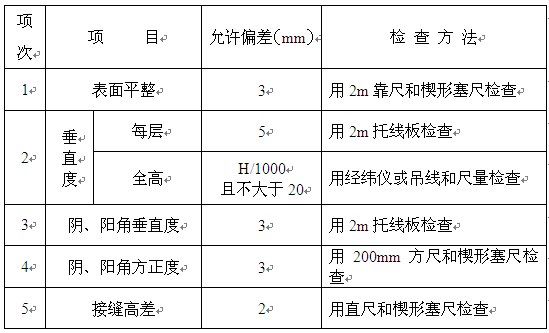
保温砂浆允许偏差及检查方法
1. Strengthen the education of finished product protection, improve the awareness of finished product protection of construction personnel, and implement the regulations of finished product protection. 7. It is strictly prohibited to go to work after sprinkling, and to laugh and fight on the feet and hands.
6、 Other precautions
1. All professional types of work shall be closely coordinated in the construction, and the process shall be arranged reasonably. It is strictly forbidden to reverse the process.
2. It is not suitable to dig holes in the insulation wall after plastering the polymer mortar. If necessary, it can only be carried out after the wall protective layer reaches the design strength. After installing the objects, it should be noted that the surrounding should be repaired and restored to the original state immediately.
3. All kinds of materials shall be stored in categories and marked with material names to avoid misuse.
4. During the construction in summer, the operation time shall be arranged properly to avoid the sun exposure period as far as possible.
5. During construction in rainy season, rainproof measures shall be taken, otherwise, insulation construction shall not be carried out.
6. The polymer mortar should be mixed with an electric mixer and cleaned after use.
7、 Finished product protection measures
1. Strengthen the education of finished product protection, improve the awareness of finished product protection of construction personnel, and implement the regulations on finished product protection
2. All professional types of work shall be closely coordinated during construction, and the process shall be arranged reasonably. It is strictly forbidden to reverse the process
3. For the thermal insulation wall which has been constructed, it is not allowed to dig holes at will, especially for the support of the outer wall downpipe, which must be embedded in advance.
4. Inflammable and solvent chemicals shall not be placed on the extruded board, and electrical welding shall not be carried out on it
5. Heavy objects shall be prevented from hitting the wall. If the scaffold is removed, it is strictly prohibited to use the window as the fulcrum or fixed point of the scaffold to prevent damage by smashing. In order to prevent the door and window from displacement, deformation and plastering, pay attention not to pollute the door and window surface.
8、 Safety assurance measures:
1. The operators must have three-level education before they can take up their posts.
2. Protective railings must be set for the operation of external scaffold.
3. When working on the external scaffold, if working on the same vertical layer, the personnel shall stagger the upper and lower layers, and cannot operate in a vertical line at the same time.
4. Hand held electric tools must have good insulation performance.
5. Inflammable and solvent chemicals shall not be placed on the upper part of the Extrusion board, and electric welders shall not be allowed to work on the Extrusion board.
6. It is strictly prohibited to throw leftover materials down in high-altitude operation. The leftover materials shall be placed in cement bags and transported to the downstairs.
7. It is strictly prohibited to go to work after sprinkling, and to laugh and fight on your feet and hands.