Dongguan city, kingda plastic insulation board co., LTD
Contact: manager zhao
Mobile phone: 13509011897
Telephone:
Fax:
Email:1440816890@qq.com
Website:www.qdjnkj.com
Address: Zhongtang town Zhancui Nan di Industrial area

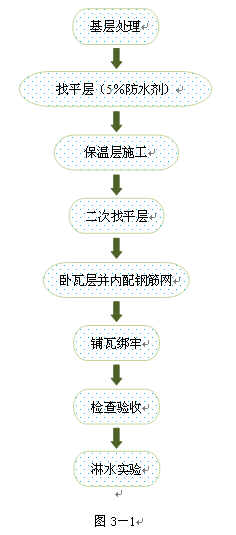
1. Construction technology
Description of slope roofing 1 (with insulation layer) with large area use and high requirement of process procedure
2. Primary treatment
2.1 clear the residual floating ash, sundries and loose concrete particles on the concrete surface of the mixed roof.
2.2 remove the concrete blocks and inclusions of the daughter's wall foot, gable wall, flue foot and other parts and repair them again.
2.3 adjust the fixed roof reserved Ø 6 reinforced, so that it is straight.
3 leveling construction
This roof waterproof mainly USES self - waterproof, tile surface waterproof and waterproof mortar waterproof. Waterproof layer is not set separately, leveling layer mixed with 5% waterproof agent as waterproof layer. Main matters of leveling construction:
3.1 the configuration of mortar layer mortar shall be configured in strict accordance with 1:3 coordination ratio, and 5% water-proofing agent shall be added.
3.2 in order to prevent cracking of mortar leveling mortar, water reducer and micro-expansion agent can be added in the right amount when mixing mortar, and the consistency can be strictly controlled.
3.3 washstring paste grey cake: according to the thickness of the plaster, make a grey cake in the range of 1cm 2 of the roof.
3.4 after the mortar slightly water, use a trowel to smooth the pressure, the surface before the final setting should be less trudging, mortar surface is not allowed to spread dry cement or cement mud pressure.
3.5 proper amount of water shall be sprayed on the surface for curing after 12h of construction.
3.6 joints shall be left in front of the intersection of leveling floor and parapet, stairwell roof, chimney, tower, etc., with the width of 10mm; In addition, the leveling layer itself should also keep the seam, the seam width of 10mm, spacing of lattice seam ≤6000mm.
3.7 in case of parapet wall, side wall, chimney, stair wall, etc., 300mm shall be turned up along the wall.
3.8 after the leveling layer is hardened, take out the caulking strip and clean it up, and remove dust, sand and oil on the surface. Apply wire brush to remove the slurry at the joints and clean it up. Use asphalt ointment to fill the lattice joint, prohibit the construction under the weather of rain and snow.
3.9 for the sealing materials that have been filled in, the protection time is generally 2 ~ 3h, and they must be protected before the insulation layer construction. It is forbidden to trample on plastic deformation and lose the waterproof ability.
3.10 see roof waterproof construction for detailed treatment.
3.11 quality inspection standards are shown in table 3-1
4. Insulation layer construction
4.1 the roof insulation material is 40mm thick extruded polystyrene board, and the specification is 1200mm×600mm×40mm.
4.2 prior to the construction of insulation layer, the layout method of the roof shall be designed and arranged according to the characteristics of each type of roof, so as to reduce the patchwork joints, achieve the best insulation effect and save materials.
4.3 first, clean up all garbage and sundries in the screed layer and keep the surface clean, flat and dry.
4.4 mix special bonding mortar, the weight ratio is water: mortar =1:5, mixing while adding water; The stirring time shall be no less than 5min, and the stirring shall be full and even, with a moderate consistency and a certain viscosity. After the mortar has been modulated, it shall be left standing for 5min, and mixed again before use. The mixed mortar shall be used up within 1h.
4.5 special interface agent for front brush of paving plate together to enhance the bonding force between the extruded plate and the bonding mortar, thin brush a special interface agent on the adhesive surface of the extruded plate; After the interfacial agent is dried, polymer bonding mortar can be applied for roofing paste construction.
4.6 adhesive extruded panels should be placed on the roof with ink lines to ensure efficient and accurate construction.
4.7 the insulation board shall not be broken, missing edges and missing corners, and should be sawn and splicing if there are missing edges and missing corners and broken uneven edges during the laying.
4.8 when pasting the extruded plate, the seam of the plate shall be squeezed tight and the adjacent plates shall be flush. The gap between the control plates shall not be greater than 2mm and the height difference between the plates shall not be greater than 1.5mm. When the gap between plates is greater than 2mm, the joints shall be filled with extruded plates. The slates shall not be bonded with mortar or cementing agent.The part of the flatness height difference between plates greater than 1.5mm shall be polished with a wood file, coarse sandpaper or grinding wheel before the construction of the surface layer.
4.9 see the energy-saving insulation construction plan for details of this section.
Roof insulation quality inspection standard
The leveling layer is basically the same as the base leveling layer, with a thickness of 1:3 cement mortar of 20mm, but no water-proofing agent is needed. Attention should be paid to the finished product protection of the insulation layer during the construction of this layer, to avoid damage caused by construction tools, materials, people, metal objects, etc. 7.4 in order to ensure smooth and straight tiling, draw a diagonal line from the roof ridge to the cornice, that is, the diagonal line is aimed at the lower right corner of the first tile on the roof ridge, and the second tile in the second row, the third tile in the third row, until the lower right corner of the cornice tile, are in a straight line. Then from the bottom up one after another, you can reach the ditch straight, neat and beautiful. As shown in figure 3-25 double leveling
The leveling layer is basically the same as the base leveling layer, with a thickness of 1:3 cement mortar of 20mm, but no water-proofing agent is needed. Attention should be paid to the finished product protection of the insulation layer during the construction of this layer, to avoid damage caused by construction tools, materials, people, metal objects, etc.
6 bedroom tile floor construction
The horizontal tile layer is the mortar layer, according to the size of the tile and the layout of the roof tile mortar layer, its thinnest place 20mm, the weight ratio is 1:3.
Lie in tile mortar configuration Ø 6 @ 500 x 500 steel mesh, steel mesh should ride across the roof and strain and the roof eaves embedded Ø 10 steel tie.
The position of the steel mesh shall be determined according to the size of the tile binding position.
7. Tile construction
7.1 firstly, the edges of flat tiles and ridge tiles should be neat, the grooves should be clear, the thickness should be uniform, and no defects such as lamination, crack or sand exposed should be allowed.
7.2 according to the arrangement of roof ridge line, cornice line and ditch line, but also according to the characteristics of roof tile and the actual size of the roof, through calculation, the actual amount of roof tile required, and pop out each row of tile and the position line of each row of tile, facilitate the laying of tile.
7.3 the order of roof tile and cover tile hanging is from the cornice from bottom to top and from left to right. Eaves tile pick out eaves 50 ~ 70mm.
7.4 in order to ensure smooth and straight tiling, draw a diagonal line from the roof ridge to the cornice, that is, the diagonal line is aimed at the lower right corner of the first tile on the roof ridge, and the second tile in the second row, the third tile in the third row, until the lower right corner of the cornice tile, are in a straight line. Then from the bottom up one after another, you can reach the ditch straight, neat and beautiful.As shown in figure 3-2
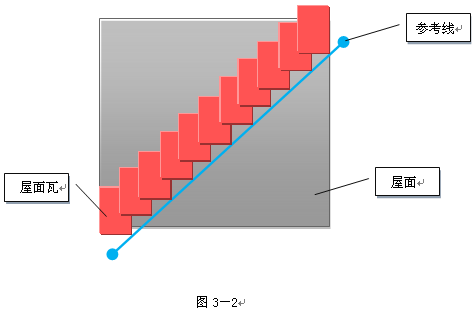
7.5 when hanging tiles, pay attention to the tile surface and corrugated flat at any time. Tiles that do not meet the quality requirements cannot be used.
7.6 inclined ridge, oblique groove tile will be first the whole tile hang, ditch edge tile requirements cover waterproof width is not less than 150mm, pop out the ink line, number number, cut off the surplus tile surface or saw off, and then hang according to the number order.
7.7 hang flat ridge, oblique ridge tile, should pull through long hemp, flat hang straight.The base shall be laid with 1:2.5 lime mortar. The gap between the ridge tile interface and the flat tile shall be tightly scraped with mortar mixed with anti-crack fiber. The overlap of ridge tile and flat tile shall not be less than 40mm on each side.
7.8 the joint port of oblique ridge is downward, and the junction of flat ridge and oblique ridge should be sealed with hemp knife ash. Paved flat ridge and oblique ridge straight, no fluctuation phenomenon.
7.9 each a piece of roof tile laying are using twin 16 copper tile and colligation fixed Ø 6 steel fabric.
See table 3-3 for the size and inspection method of roof covering of 7.10 watt
7.11w roofing quality inspection items, requirements and inspection methods are shown in table 3-4
After the roofing tile is laid, it shall be inspected and accepted by the supervision and party a first.
Drenching test is to check whether there is water seepage on the roof and whether the water drainage is unobvious. The test should be carried out after rain or after continuous drenching for 2 hours. After the inspection, the quality acceptance record and the water test record of the branch project shall be filled in